
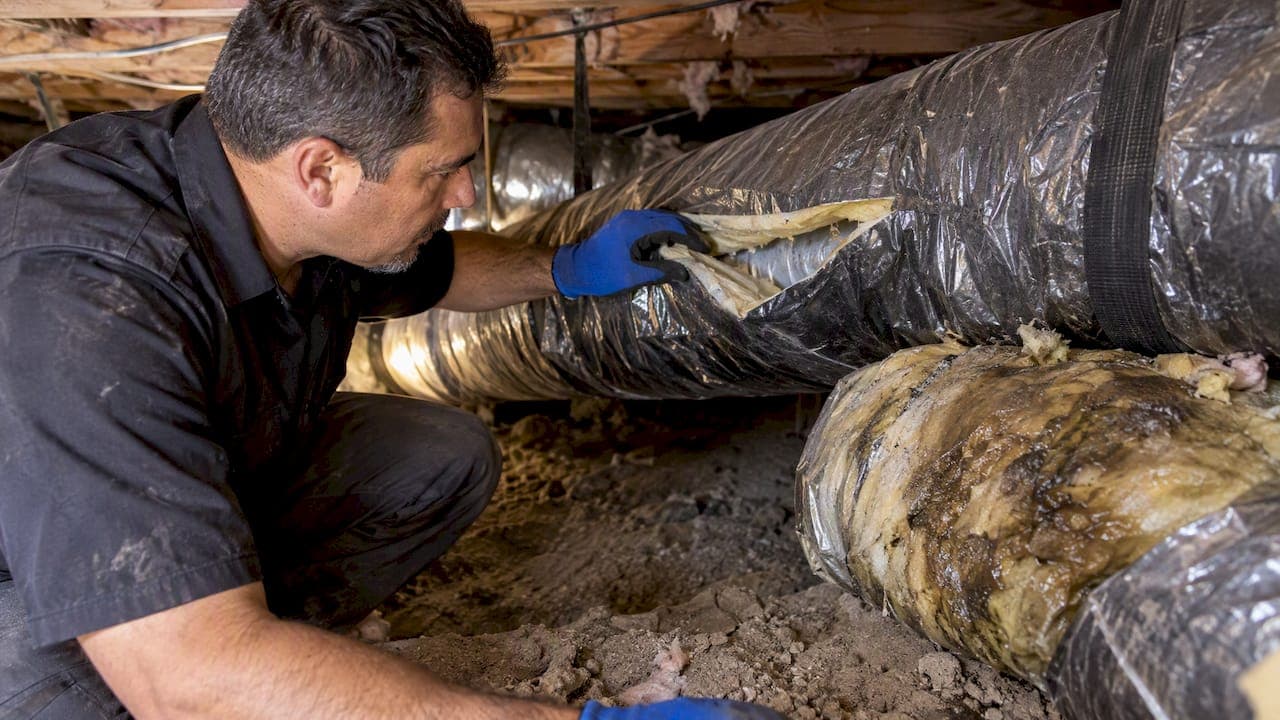
Small, dry splits in duct jacket or vapor barrier are usually repairable with tape and mastic. Wet, saturated, or moldy insulation is not: it has to come out and get replaced, according to EPA guidance. The moment you spot either problem, stop running the HVAC system on that duct run and take photos before touching anything.
TL;DR:
- Turn off the HVAC system serving the damaged duct, and photograph the area before touching insulation or disturbing any suspected mold.
- Repair a dry, localized jacket split only if the inner liner and fiberglass remain intact; use UL rated tape or mastic and secure the duct.
- Wet or moldy fiberglass cannot be effectively cleaned; remove and replace it, and fix roof, plumbing, condensate, or humidity sources before installing insulation.
- Call a licensed contractor for visible mold, widespread wetting, suspected asbestos, or inaccessible ducts; ask about containment, drying plans, insurance, and a written estimate.
- For attic ducts, R value 8 is a common minimum; buried ducts in hot, humid climates may need R value 13 to limit condensation.
Table of Contents
- How to Spot Split Seams, Exposed Insulation, and Mold
- Why Duct Insulation Fails in the First Place
- What to Do the Moment You Find Damage
- Repair or Replace: How to Decide
- Fixing a Split Seam in Flexible Duct, Step by Step
- Why Wet or Moldy Insulation Can't Just Be Cleaned
- Preventing the Next Round of Duct Damage
- When to Call a Licensed HVAC Contractor
- A Homeowner's Bottom Line on Duct Insulation
- How We Handle Duct Insulation Repairs and Replacement
- FAQ
- Sources
How to Spot Split Seams, Exposed Insulation, and Mold
Before deciding on a fix, you need to know what you're actually looking at. A quick, safe walkthrough of your attic or crawlspace tells you most of what a contractor would want to know anyway.
Look for these visual clues:
- Torn or peeling vapor barrier, especially at seams and elbows where flex duct bends.
- Fiberglass insulation poking through a split jacket or sagging away from the duct.
- Missing or crushed insulation sections, often from foot traffic or stored boxes in the attic.
- Dark staining, discoloration, or a musty smell near the duct, which usually points to standing moisture.
Physical damage often shows up as comfort problems first. Rooms that run warmer or colder than the rest of the house, ducts that feel damp to the touch, or a new musty odor near a vent are all signs worth tracing back to the duct itself.
Bring a flashlight, gloves, and a phone camera. Photograph anything unusual before moving insulation, and avoid poking at dark, fuzzy, or slimy patches that could be mold. Disturbing it can release spores into the air you're about to breathe.

Why Duct Insulation Fails in the First Place
Duct insulation rarely fails for one reason alone. Most damage traces back to either physical stress or moisture, and the two often show up together.
Mechanical causes include:
- Flex duct shifting or stretching where it isn't properly supported, which stresses seams over time.
- Rodents chewing through jacket material to reach warmth inside the insulation.
- UV exposure and age breaking down the outer jacket in attics with skylights or vents.
Moisture causes are just as common. Attic condensation happens when warm, humid air meets a cold duct surface below the dew point, a problem DOE's duct insulation guidance addresses directly through proper vapor barrier sealing. Roof leaks, plumbing drips, and clogged condensate lines add to the problem.
Left alone, the consequences compound. Leaky, poorly insulated ducts can account for a meaningful share of a home's conditioning losses, according to Building America's duct sealing guidance, which also drives up HVAC runtime and wear. Mold growth compounds the indoor air quality risk on top of the energy waste.
What to Do the Moment You Find Damage
Finding damaged insulation doesn't mean you need to panic, but your first moves matter.
- Turn off the HVAC system or close the damper to the affected zone if you can do so safely.
- Stop running air conditioning on sweating ducts in humid weather. Moist air circulating over an already wet duct makes the problem worse.
- Photograph the damage from multiple angles before touching anything, for your own records and for a contractor's estimate.
- Address any active leak at its source. A dripping pipe or roof leak above the duct needs to stop before any repair will hold.
- Run a dehumidifier or box fan in the area if it's safe and won't blow debris into the exposed insulation.
Pro Tip: Keep a simple log with dates and photos every time you notice sweating or staining. Patterns over weeks tell a contractor more than a single snapshot.
Some situations call for a professional immediately rather than a DIY attempt: visible mold growth, suspected asbestos in older insulation, large wet areas, or ducts buried too deep in insulation to reach safely.
Repair or Replace: How to Decide
Not every damaged duct needs to come out. The decision comes down to a handful of concrete checks.
Repair is usually appropriate when the damage is:
- Dry, with no staining, musty smell, or history of standing water.
- Localized to a single seam split or small jacket tear, not spread across multiple sections.
- Sitting on an intact inner liner, meaning the vapor barrier and fiberglass underneath are undamaged.
- Easy to reach without tearing into finished ceilings or walls.
Replacement becomes necessary when:
- The insulation is wet or shows mold growth, since porous fiberglass that's been wet cannot be effectively cleaned and must be removed, per EPA's duct cleaning guidance.
- The inner liner itself is contaminated, not just the outer jacket.
- You're dealing with large or multiple splits across a run rather than one isolated spot.
- The damage has been present long enough that moisture has had time to migrate or settle into surrounding insulation.
Run through five quick questions before you decide: How big is the damaged area? Is anything wet? Is there any visible mold or musty smell? Can you reach it without demolition? Does anyone in the house have respiratory sensitivities that make erring toward replacement the safer call? A "yes" to wet, moldy, or hard-to-reach usually settles the question in favor of replacement.
Fixing a Split Seam in Flexible Duct, Step by Step
For dry, localized splits, a careful homeowner repair can hold up for years if done with the right materials.
What you'll need:
- UL-181 foil tape (not household duct tape, which fails under temperature cycling)
- UL-181 B-M listed mastic
- Tie bands or rot-proof twine
- Scissors or a utility knife
- Work gloves, and an N95 mask if the area is dusty
Here's the sequence:
- Make sure the area is completely dry, then clean away loose debris and dust from around the split.
- Trim the torn vapor barrier edges so you have a clean flap that can overlap the repair area by a few inches on each side.
- Remove any loose or compressed insulation right at the seam edges so the tape or mastic bonds to solid material, not crumbling fiberglass.
- Apply mastic or UL-181 tape across the sealed, overlapping flap, following the approach DOE's plenum insulation guidance recommends for maintaining a continuous vapor retarder.
- Mechanically secure the repair with tie bands or approved fasteners so it doesn't shift as the duct flexes.
- Smooth the tape or mastic down firmly and inspect the full seam for gaps.
- Re-support the duct where it was sagging, since unsupported runs are what stress seams in the first place.
- Run the system briefly and recheck the repair for new sweating, leaks, or loose tape.
Pro Tip: If sweating comes back within a day of the repair, the problem usually isn't the patch. It's moisture control in the attic, and that calls for a professional look.
Why Wet or Moldy Insulation Can't Just Be Cleaned
This is the one category of damage where repair isn't an option, no matter how small the wet patch looks.
EPA guidance is direct on this point: once fiberglass duct insulation gets wet or moldy, it cannot be effectively cleaned and should be removed and replaced. Fiberglass is porous. Moisture and mold spores work their way into the fibers in a way that surface cleaning or sealants can't reach. Sealants should never go over wet or actively growing mold, since trapping moisture behind a sealed surface tends to make the problem worse, not better.
A professional replacement typically follows this sequence:
- Remove and dispose of the contaminated insulation.
- Inspect the duct interior and metal surfaces, cleaning and drying what's reachable.
- Install new insulation with a proper vapor barrier, sealed and mechanically fastened.
- Test the repaired section for air leakage before closing everything back up.
None of that matters long term if the moisture source stays unaddressed. A leaking roof, a dripping pipe, a clogged condensate line, or chronically high indoor humidity will just soak the new insulation again. Fixing the source, confirming condensate pans drain properly, and controlling humidity are part of any real fix, and in some cases encapsulating the duct run or relocating it out of a problem area makes more sense than another round of insulation.
Preventing the Next Round of Duct Damage
A repair or replacement is only worth doing once if you also close off the conditions that caused the damage.
- Seal every seam, collar, and boot with mastic or UL-181-rated tape rather than household duct tape, which Building America's sealing guidance specifically advises against for duct work.
- Consider a duct blaster leakage test before any encapsulation project, so you're not sealing air leaks inside insulation that still won't hold.
- Support flex duct with straps or saddles spaced to prevent sagging, and avoid compressing insulation, which quietly destroys its effective R-value.
- Insulate and seal fittings and boots separately. These transition points are where most leaks and splits actually start.
- Match insulation R-value to your climate and application. R-8 is a common minimum for attic ducts, and BASC/PNNL guidance recommends R-13 where ducts are buried in hot-humid climates to avoid condensation.
Encapsulation or spray foam over ducts can work well, but only after the ducts are confirmed airtight and vapor control is in place. Skipping that step just traps future condensation problems under a sealed surface. For readers weighing a full duct upgrade, why ductwork matters for HVAC efficiency and comfort covers how these choices play out in day-to-day performance.
When to Call a Licensed HVAC Contractor
A homeowner repair works for small, dry, accessible splits. Beyond that, bringing in a licensed contractor protects both your home and your health.
Call a professional when you see:
- Any sign of mold growth, since safe removal and disposal require proper containment.
- Extensive wetting that's spread across more than one section of duct.
- Ducts buried too deep in attic insulation to reach or inspect safely.
- A situation where a duct blaster leakage test or full encapsulation is being considered, since both require equipment most homeowners don't have.
Before hiring anyone, ask for proof of license and insurance, their specific method for removing contaminated insulation, what protocol they follow for drying and preventing mold regrowth, and a written estimate before work starts. A contractor who can answer those clearly, without vague reassurances, is one worth trusting with the job.
A Homeowner's Bottom Line on Duct Insulation
The pattern holds across almost every case I've walked homeowners through: a small, dry seam split is a weekend fix with tape and mastic. The moment insulation has been wet, or you catch a musty smell, the calculation changes completely. That insulation needs to come out.
When you're unsure which category you're in, a professional inspection costs far less than guessing wrong and dealing with recurring mold or energy loss later. Trust the moisture test over your instinct to patch and hope.
— Edward
How We Handle Duct Insulation Repairs and Replacement
We inspect, repair, and replace damaged duct insulation as part of our residential HVAC services, including mold-safe removal, resealing with proper vapor barrier materials, and leakage testing once the work is done.

A typical visit starts with a straightforward assessment: the extent of the damage is evaluated, moisture involvement is confirmed, and a written estimate is given before any work begins. Flexible payment options, including financing, are available for larger replacement or HVAC installation projects. If the damage affects your heating performance specifically, our heater repair technicians can handle that alongside the duct work.
Photograph what you're seeing, save your notes, and contact a licensed HVAC contractor; professional services are available around the clock, including weekends and holidays, for a prompt inspection.
FAQ
Is it okay to put insulation around ductwork?
Yes, insulating ductwork is standard practice and improves energy efficiency, as long as the insulation includes a proper vapor barrier and is sealed at seams with UL-181 tape or mastic rather than ordinary duct tape, per DOE guidance. Poorly sealed insulation can trap condensation instead of preventing it.
What are the downsides of duct cleaning?
Duct cleaning doesn't fix wet or moldy fiberglass insulation. EPA guidance states that contaminated porous insulation can't be effectively cleaned and needs to be removed and replaced instead. Cleaning also does nothing to address the underlying moisture source causing the damage.
How to repair a large hole in ductwork?
A large hole usually needs more than tape alone. It typically requires patching with sheet metal or a matching duct section, sealed at all edges with mastic and mechanically fastened, following the sealing approach outlined in Building America's duct guidance. For holes near seams or connections, a licensed contractor can confirm the repair holds under system pressure.
Can insulation be repaired?
Small, dry splits in the jacket or vapor barrier can be repaired with UL-181 tape or mastic and mechanical fastening. Insulation that's been wet or shows mold cannot be repaired. It has to be removed and replaced, since moisture degrades fiberglass in a way sealing over it won't fix.
Sources
- Energy
- Duct Sealing | Building Science / Building America (DOE)
- Encapsulated ducts | Building America Solution Center (BASC/PNNL)