
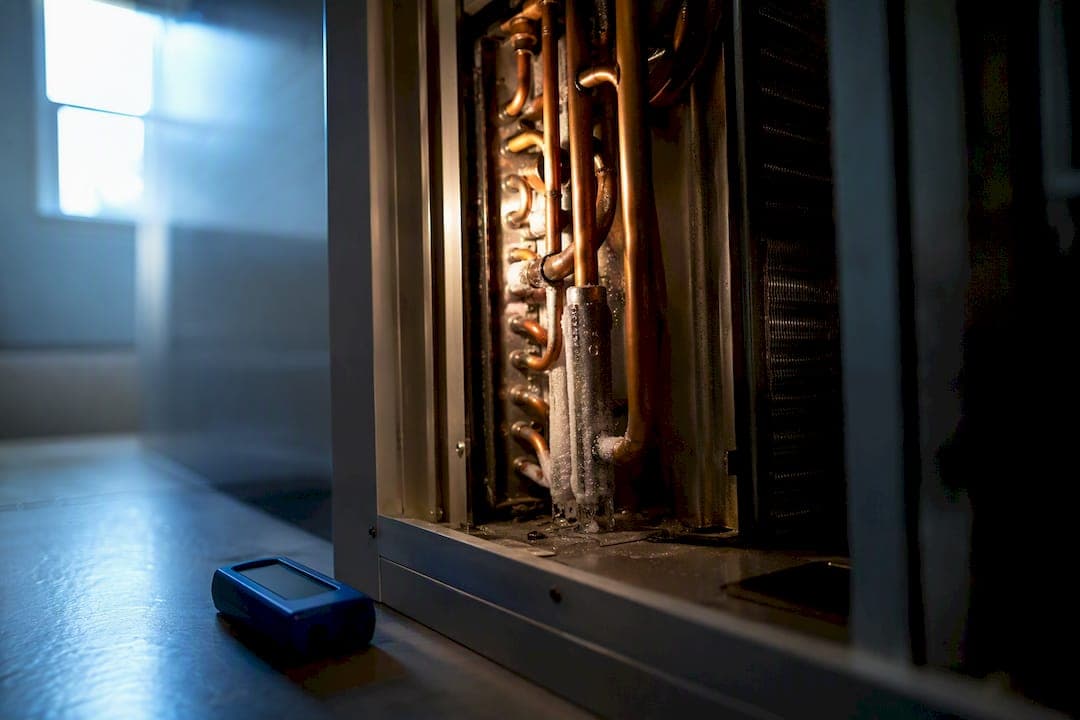
If you see frost on the indoor coil, weak airflow, or an oily film near the air handler, you likely have a refrigerant leak at the evaporator coil, and the long-term fix is usually replacement, not a sealant patch. EPA rules require a certified technician to handle any refrigerant work, so the safest move is to shut off the system if you see ice or hear hissing, then schedule a professional diagnosis.
TL;DR:
- Repairing a refrigerant leak on an evaporator coil typically involves replacement rather than patching, especially if corrosion or multiple leaks are present.
- Signs like ice buildup, hissing sounds, oily residue, and weak airflow indicate a leak needing immediate professional diagnosis for proper repair.
- R-22 systems with leaks are more challenging and costly to fix because of phasedown policies, making full replacement often a more economical choice.
- Coil replacement costs range from about $1,000 to over $5,000, heavily influenced by accessibility, refrigerant type, and disposal fees; patch repairs are significantly cheaper but less durable.
- Always verify a technician's EPA certification, licensing, and insurance, and insist on a detailed, written estimate and diagnosis before proceeding with repairs.
Table of Contents
- What an evaporator coil does and how a leak changes your system
- Signs your evaporator coil may be leaking
- What causes evaporator coil leaks in the first place
- Repair options: patch, coil replacement, or full-system replacement
- Typical costs and what drives the price
- Safe DIY triage before the technician arrives
- How to choose a contractor and what to ask
- What years of coil diagnostics teach you about repair versus replace
- Get a straight answer on your coil, fast
- Sources
What an evaporator coil does and how a leak changes your system
The evaporator coil sits inside your air handler or furnace cabinet, hidden behind an access panel most homeowners never open. Its job is simple: refrigerant flows through it, absorbs heat from the air moving across it, and sends that cooled air through your ducts. When the coil leaks, refrigerant volume drops, pressure inside the system falls out of balance, and the coil can't pull heat the way it's designed to. That's what produces weak, warm airflow and ice buildup, both classic ac low freon symptoms. Older systems running R-22 face a bigger complication than newer R-410A units, since R-22 production has been phased down for years, making a straight recharge expensive or impractical and pushing many owners toward coil or system replacement instead.
Signs your evaporator coil may be leaking
Refrigerant leak signs tend to show up in a predictable order, and knowing which ones demand an immediate call versus a few days of monitoring can save you a compressor.
- Ice or frost on the indoor coil or refrigerant lines. This is one of the most specific signs of a refrigerant leak and warrants an immediate call.
- Hissing or bubbling sounds near the indoor unit, which often points to refrigerant escaping through a small opening.
- Oily residue around the coil, drain pan, or line set. Refrigerant oil often leaves a visible film near leak points, and it's one of the easier signs to check without opening anything.
- Weak or warm airflow from vents that used to blow cold.
- Longer run times and climbing energy bills, since a low-refrigerant system works harder to hit the same temperature.
Ice, hissing, and oily residue mean call now. Weak airflow and rising bills alone can wait a day or two, but they rarely fix themselves.
What causes evaporator coil leaks in the first place
Most coil leaks trace back to one mechanism: formicary corrosion. Volatile organic compounds from ordinary household items, cleaning sprays, air fresheners, new carpet adhesives, drift through your return air and react with the coil's copper tubing. Over months or years, that reaction eats microscopic, clustered pinholes into the metal. It's an odd, almost ant-trail pattern of tiny openings rather than one clean hole, which is exactly why sealing it permanently is so hard.
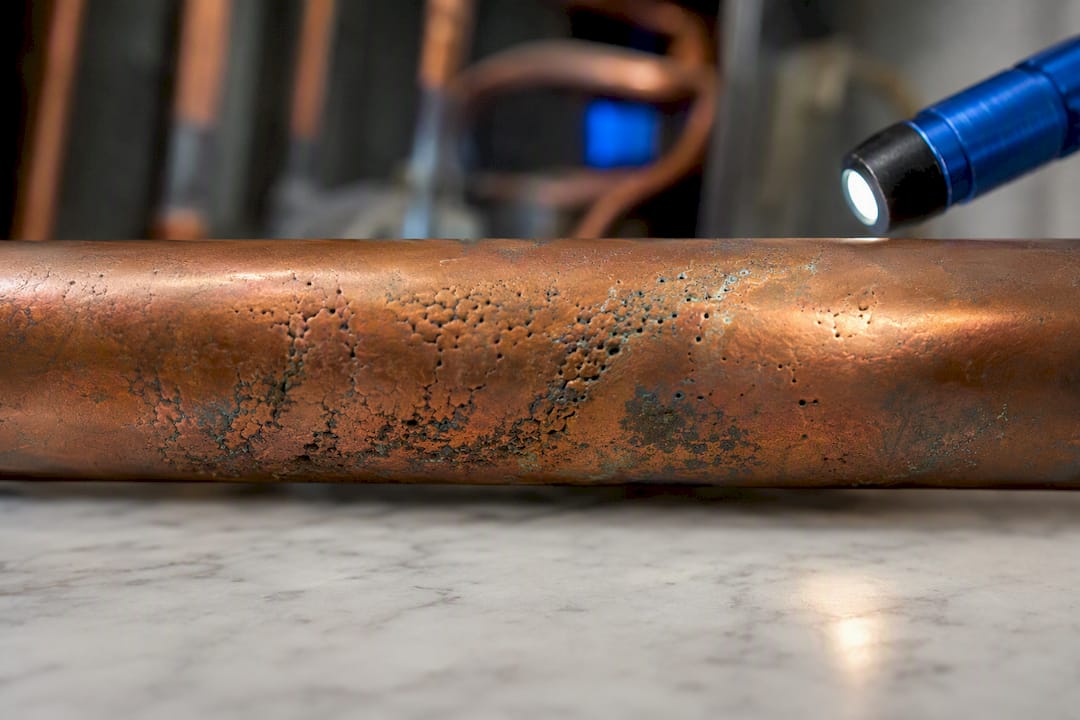
Beyond VOC-driven corrosion, coils fail from plain age, accidental physical damage during a filter change or duct repair, and freeze-related stress when restricted airflow or already-low refrigerant lets ice form and expand against the coil fins. Because formicary corrosion rarely produces just one leak point, a patch that stops today's hiss often just relocates the next one a few inches down the tubing.
Repair options: patch, coil replacement, or full-system replacement
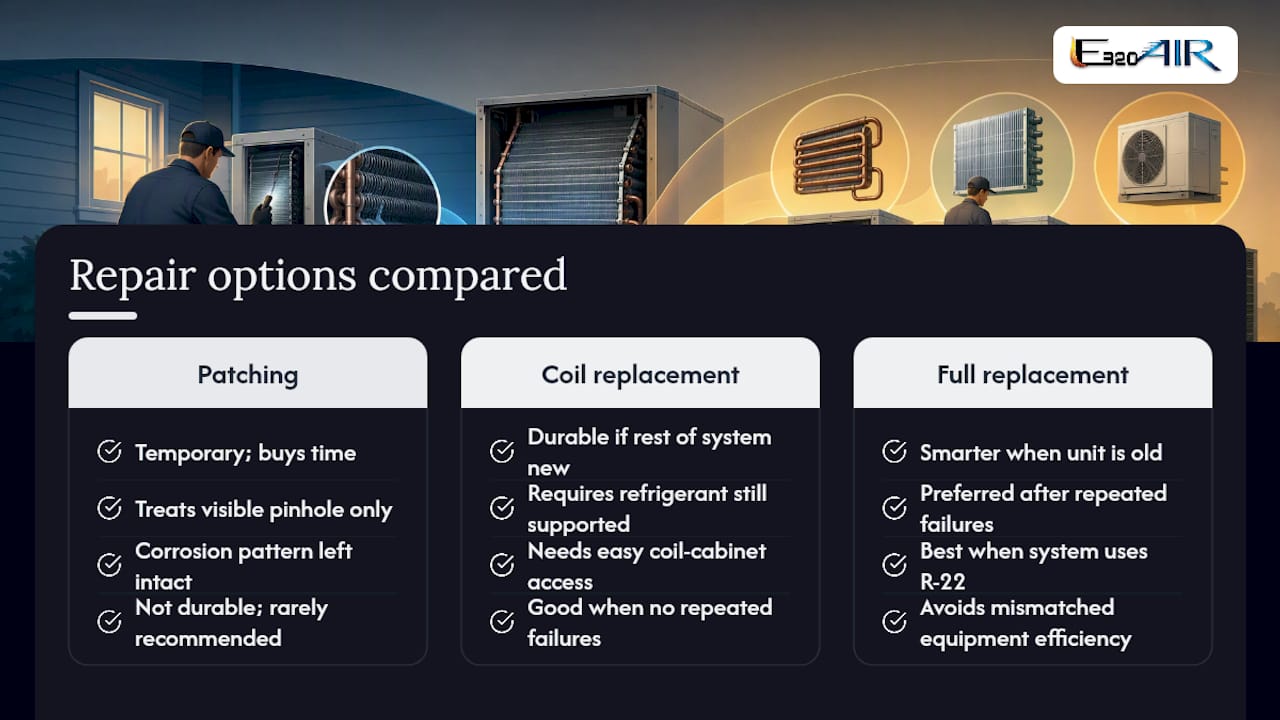
Sealant patches and injectable coil sealants exist, and they can buy time. They rarely offer a lasting fix, though, because they treat one visible pinhole while leaving the corrosion pattern that caused it untouched underneath. Industry guidance is blunt on this point: patching is rarely a durable repair, and replacement is usually recommended once a coil is confirmed to be leaking.
Coil replacement alone makes sense when the rest of the system is relatively new, the refrigerant type is still supported, and the coil cabinet is easy to access. Swap the coil, recharge with the correct refrigerant, and the system runs like new for its remaining service life.
Full-system replacement becomes the smarter math when the unit is old, has failed more than once, or still runs on R-22. Pairing a new coil with an aging condenser built for a phased-down refrigerant often costs nearly as much as replacing both, and you're left with mismatched equipment efficiency. Any refrigerant work involved, recovery, recharge, or disposal, has to go through a technician certified under EPA Section 608. That's not optional paperwork; it's federal law covering how refrigerants get handled and recovered.
Typical costs and what drives the price
Evaporator coil replacement commonly runs from about $1,000 to $5,000 or more, depending on system type, refrigerant, and how buried the coil is in your ductwork. Smaller repairs, like patching a single accessible leak point and recharging, can land in the $150 to $1,000 range, though that's the option least likely to hold up over time.
| Cost factor | How it moves the price |
|---|---|
| Coil accessibility | Tight furnace cabinets or attic installs add labor hours |
| Refrigerant type | R-22 systems cost more due to phased-down supply |
| Matched components | Coil must match your condenser's tonnage and metering device |
| Disposal fees | Old coils and recovered refrigerant require certified disposal |
| Warranty terms | Longer parts/labor warranties usually raise upfront quotes |
Regional labor rates shift every number on this list, sometimes by a few hundred dollars in either direction. Ask any contractor for a written, itemized estimate that separates parts, labor, refrigerant recovery, and disposal, so you're comparing real bids instead of vague round numbers.
Safe DIY triage before the technician arrives
You can do a few things safely while you wait for a service appointment, and a few things you should never touch.
- Check and replace your air filter if it's dirty. Restricted airflow makes coil freezing worse.
- Inspect the condensate drain pan and line for standing water or clogs.
- Look at the coil area for visible ice or oily residue without removing panels or touching refrigerant lines.
- Check your thermostat settings and breaker panel to rule out simpler causes.
- If you see heavy ice or hear active hissing, power down the system at the thermostat or breaker and call for service.
Never attempt to add refrigerant yourself, open sealed refrigerant lines, or apply a DIY sealant kit directly to the coil. Topping off refrigerant without fixing the leak risks compressor damage and just masks the real problem. Refrigerant recovery and handling legally requires EPA Section 608 certification, and it's not a job for a garden hose and a hardware-store gauge set.
How to choose a contractor and what to ask
Before anyone touches your system, confirm three things: EPA Section 608 certification, a valid state contractor license, and active liability insurance. Ask for recent references and get any warranty in writing before work begins.
- Ask what diagnostic steps they'll perform and whether pressure testing or an electronic leak detector is included.
- Request an itemized estimate covering parts, labor, refrigerant recovery, and disposal separately.
- Confirm the project timeline and what happens if a mismatched part needs ordering.
- Get the warranty terms, parts and labor, in writing before signing anything.
Watch for red flags: a technician pushing to simply "top off" refrigerant without locating the leak, open-ended pricing with no estimate, or no written warranty offered at all.
Pro Tip: Ask the technician to show you the leak detection reading or dye trace results before they quote a repair. A contractor confident in the diagnosis will usually walk you through it without hesitation.
What years of coil diagnostics teach you about repair versus replace
In the field, three things usually decide whether a leaking coil gets patched, replaced, or the whole system gets swapped: the system's age, how much VOC exposure the coil has seen over its life, and how hard it is to physically reach the cabinet. A five-year-old coil with one clean leak point is a different conversation than a twelve-year-old R-22 unit with corrosion scattered across the fins.
An honest diagnostic visit should end with a written explanation of what a technician found, not just a number. If a contractor can't show you where the leak is or why they're recommending a specific fix, ask again before you sign anything. Get the diagnosis in writing, and lean on a licensed HVAC repair provider rather than guessing based on symptoms alone.
— Edward
Get a straight answer on your coil, fast
Technicians certified under EPA Section 608 run diagnostics on evaporator coils across residential and commercial systems, so you get a real answer on patch versus replacement instead of a guess.

When you book a visit, expect a technician to pressure test or electronically scan the coil, walk you through what they find, and hand you a written, itemized quote covering parts, labor, refrigerant recovery, and warranty terms before any work starts. If the coil or the whole system needs swapping, a professional provider can handle both, matching new components to your existing ductwork rather than forcing a one-size fix. Homeowners dealing with an aging R-22 system often find full system replacement pencils out better than chasing another patch. Start by scheduling a diagnostic visit and get your coil issue on paper instead of guessing at it.
Sources
- Managing refrigerant in stationary refrigeration and air-conditioning equipment — EPA (Section 608)
- Heat Pump Repair Cost: Price Ranges, Labor, and Savings for U.S. Buyers 2026 – Trane
- AC evaporator coil replacement cost — HomeAdvisor
- Seven telltale signs of an HVAC refrigerant leak — ACHR News