TL;DR:
- Common HVAC issues often stem from simple, fixable causes like filters, circuit breakers, or thermostat settings.
- Proper troubleshooting includes safety precautions, documentation, and step-by-step checks of system components.
- When problems persist or involve electrical or refrigerant issues, professional help is essential to avoid costly damage.
Your home suddenly feels like an oven and your HVAC won't respond. It's 95°F outside, you have no idea where to start, and a service call could cost you hundreds before the technician even touches the unit. The good news: a large share of HVAC complaints that Norco homeowners and property managers face every summer can be traced back to a handful of fixable root causes. This guide walks you through a methodical, step-by-step approach so you resolve the most common issues fast, avoid unnecessary repair costs, and know exactly when to hand it off to a pro.
Table of Contents
- What you need before you start troubleshooting
- Step-by-step: Diagnosing common 'no-cooling' or 'not working' problems
- Advanced troubleshooting: Handling ice, error codes, and tricky symptoms
- When to call a professional (and how to document the issue)
- Why most HVAC emergencies are preventable (and what Norco homeowners miss)
- Professional help in Norco: Fast fixes when DIY isn't enough
- Frequently asked questions
Key Takeaways
| Point | Details |
|---|---|
| Start with simple checks | Basic thermostat and power checks resolve many common HVAC failures. |
| Airflow is critical | Dirty filters or blocked vents are top causes of poor system performance. |
| Know DIY limits | Leave refrigerant and complex electrical issues to certified technicians to avoid safety risks. |
| Document your findings | Proper symptom tracking ensures faster, more effective repairs when pros are needed. |
| Preventive care saves money | Regular maintenance and filter changes can prevent most emergency HVAC breakdowns. |
What you need before you start troubleshooting
Now that you know what to expect, start by gathering the right tools and preparing your workspace.
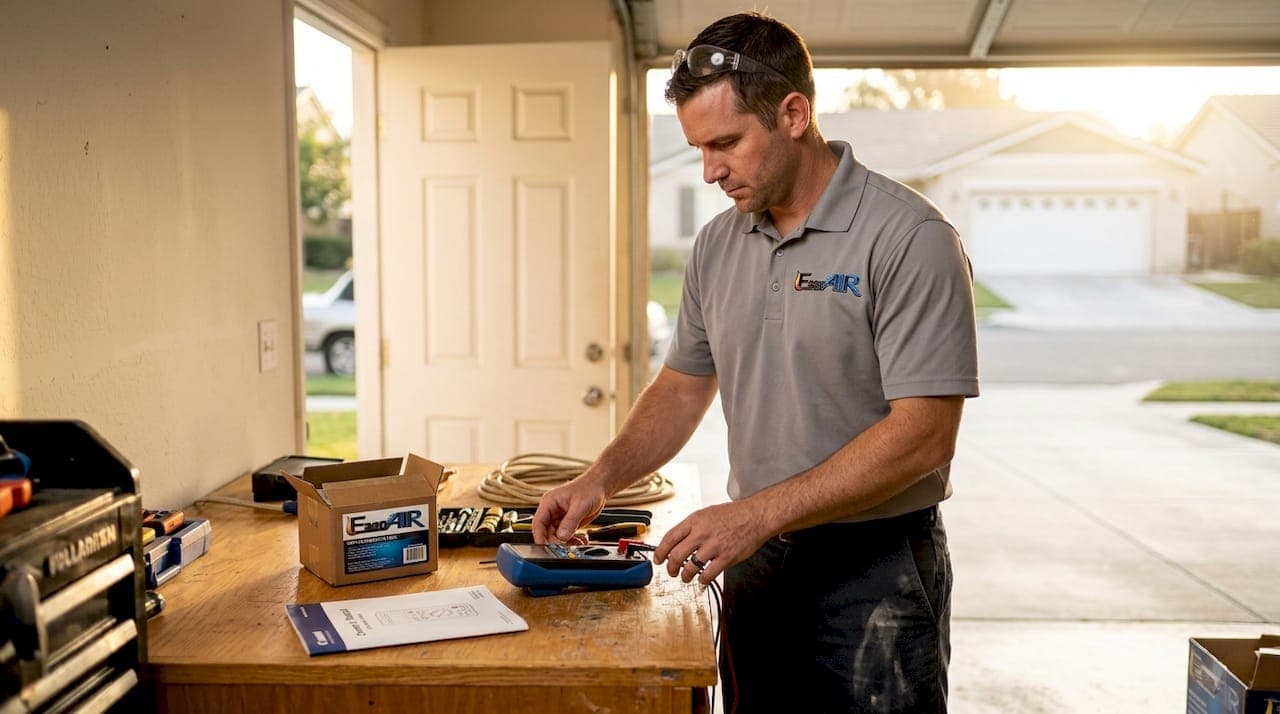
Before you poke around any HVAC equipment, you need the right items on hand. Rushing in empty-handed wastes time and can turn a simple fix into a safety hazard. Here's exactly what to pull together before you begin.
Essential tools and items:
- Flashlight or headlamp (many air handler compartments are poorly lit)
- Basic hand tools: screwdrivers, pliers, nut driver set
- Fresh thermostat batteries (AA or AAA, depending on model)
- Your system's owner's manual or the model number to pull specs online
- A notepad or your phone for logging symptoms and steps
- Non-contact voltage tester if you have one
Safety comes first. Shut off power to the system at the disconnect box and at the circuit breaker before you open any electrical panel or access cover. Never skip this step, even for a "quick look."
Pro Tip: Locate the data tag on your outdoor condenser and take a photo of it. The model and serial number will save you time if you need to search for error code definitions or order a part.
For most HVAC "not working" calls, start with controls first: verify thermostat settings and replace the batteries, check the circuit breaker, confirm the local disconnect switch is in the ON position, and perform a safe system reset by turning the thermostat off for 30 seconds before restarting.
Property managers need a slightly different approach. Rather than relying on memory, document every component check using a written or digital workflow that records the symptom, the test performed, and the result. This makes it easy to spot repeat failures across multiple units.
| Item | Why you need it | Where to find it |
|---|---|---|
| Owner's manual | Error codes, wiring diagrams | Manufacturer website |
| System data tag | Model/serial for parts lookup | Outdoor unit or air handler |
| Thermostat batteries | Eliminates no-power false alarms | Hardware store |
| Flashlight | Safe visual inspection | Tool drawer |
| Voltage tester | Confirms power is off | Hardware store |
Understanding HVAC filter basics before you start is also smart, because a clogged filter is one of the first things you'll check and one of the most common culprits behind HVAC failures.
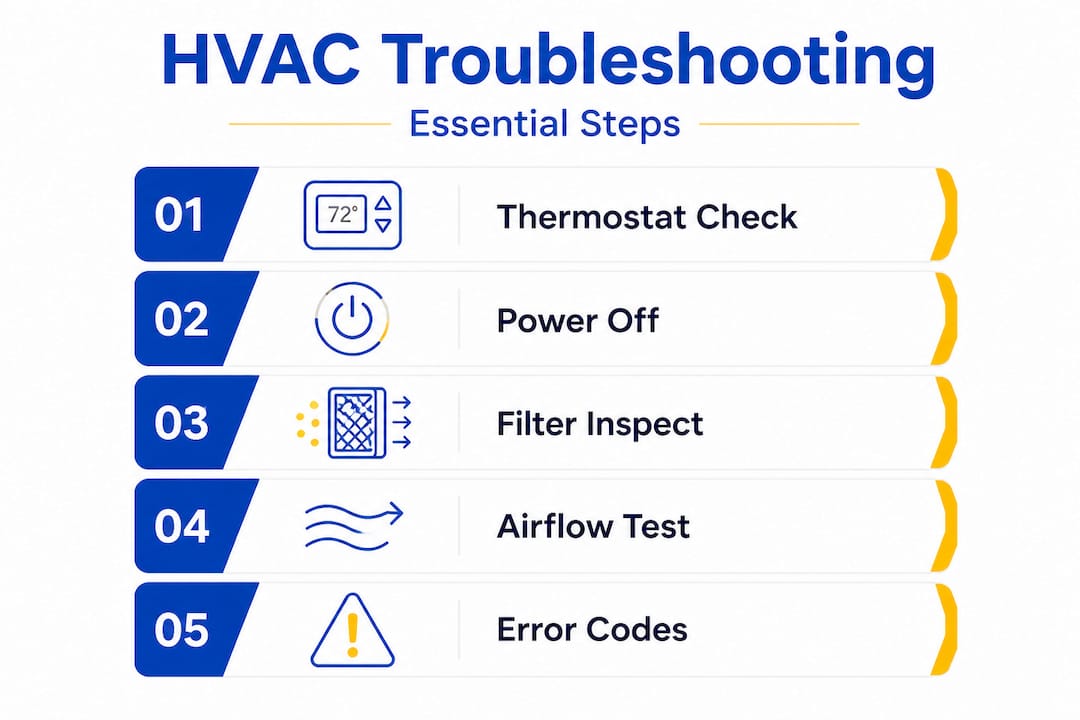
Step-by-step: Diagnosing common 'no-cooling' or 'not working' problems
With your tools in place and preparations done, you're ready to use this step-by-step checklist for reliable results.
Most HVAC failures in Norco aren't mysterious. They follow predictable patterns, and working through this sequence will solve the majority of basic complaints without a service call.
-
Check the thermostat first. Confirm it's set to COOL, the temperature setpoint is below the current room temperature, and the fan is set to AUTO. Replace the batteries regardless, because weak batteries cause more phantom malfunctions than most people realize.
-
Inspect the circuit breaker and disconnect. A tripped breaker is an extremely common cause of sudden shutdowns. Flip it fully to OFF and back to ON. Check the outdoor disconnect box (usually mounted near the condenser) to make sure it's fully seated.
-
Check and replace the air filter. A severely clogged filter starves the system of airflow and can cause the evaporator coil to freeze, the blower to overheat, or the system to short cycle. Pull the filter, hold it to a light, and if you can't see through it, swap it for a fresh one.
-
Inspect the outdoor condenser unit. Clear any leaves, debris, or overgrown vegetation from around the unit. Confirm the fan blade is spinning when the system is running. If the fan isn't moving, the capacitor may have failed, which is a common fix in hot climates like Norco.
-
Check the condensate drain pan. A clogged drain triggers a safety float switch that shuts the system off. If the pan has standing water, the drain line is blocked. Use a wet/dry vac to pull the clog from the exterior end of the drain line.
-
Reset and test. After each fix, allow the system to run for 15 minutes and feel the air coming from a supply vent. Following AC troubleshooting steps in the right order prevents you from chasing false leads.
"For most HVAC issues, thermostat and airflow checks are the highest-impact starting points before moving to drain, refrigerant, or electrical diagnostics."
| Symptom | Most likely cause | Quick check |
|---|---|---|
| System won't start | Tripped breaker or bad thermostat battery | Breaker panel and thermostat |
| Warm air blowing | Dirty filter, wrong thermostat mode | Filter condition, thermostat settings |
| System runs but shuts off quickly | Frozen coil or clogged drain | Filter and drain pan |
| Outdoor unit not running | Failed capacitor or disconnect off | Disconnect box, fan spin |
| Water near air handler | Clogged condensate drain | Drain pan, drain line |
Pro Tip: If you manage rental properties, keep a stash of the correct filter sizes at each property. An on-the-spot filter change avoids an unnecessary maintenance call and keeps tenants comfortable. For broader guidance on diagnosing cooling problems, AC repair resources for nearby communities often apply directly to Norco systems too.
Advanced troubleshooting: Handling ice, error codes, and tricky symptoms
Sometimes, basic checks aren't enough. Here's how to handle more advanced warning signs.
If you've worked through the checklist above and the problem persists, you're now in advanced territory. These symptoms require more careful handling, and some of them signal a clear limit for DIY work.
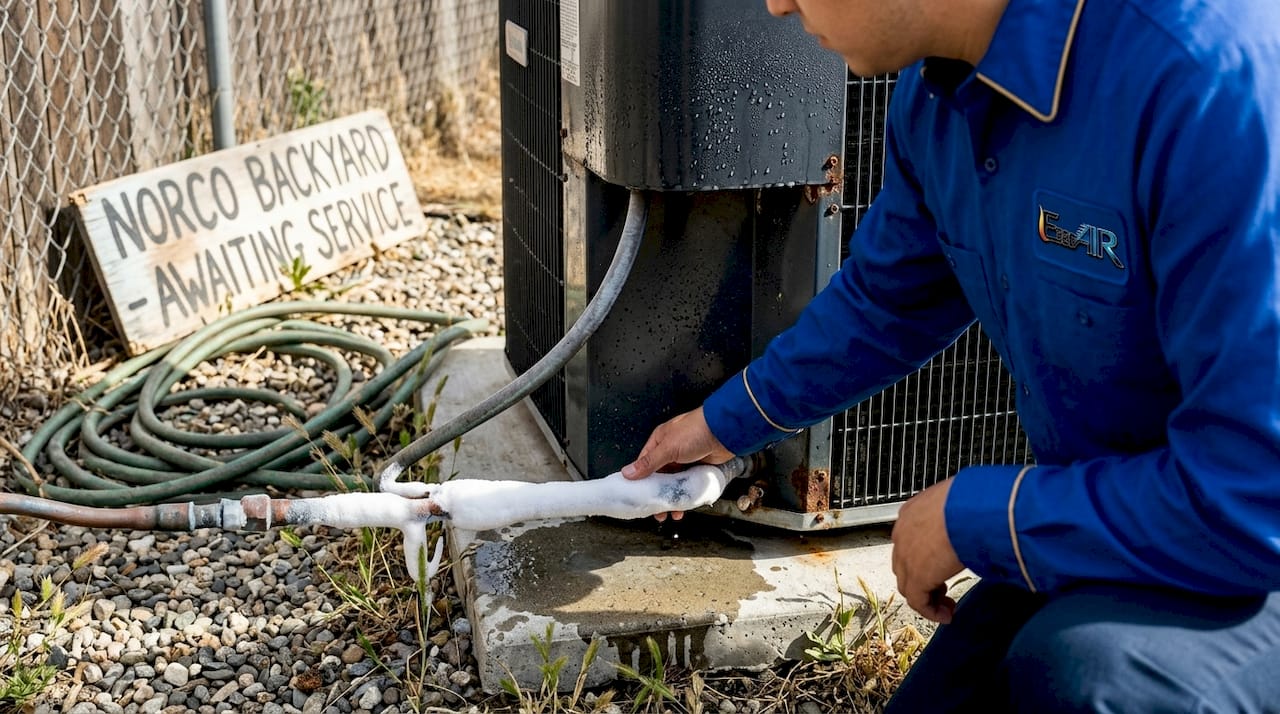
Ice on the unit or refrigerant lines
Seeing ice on the copper lines or evaporator coil is a sign to stop immediately. Iced refrigerant lines indicate an airflow problem or refrigerant charge issue. Restarting a frozen system can damage the compressor, which is one of the most expensive components to replace. Turn the system off, switch the fan to ON only (not cooling), and let it thaw completely before restarting. If ice returns after you've confirmed the filter is clean, you need a licensed technician to check refrigerant charge.
Error codes and LED fault lights
Modern HVAC systems use blinking LED patterns or digital error codes to communicate faults. These are useful, but only if you read them correctly. Always confirm error codes against your specific model's manual, not a generic list online, because the same blink pattern can mean completely different things across brands. After clearing a code and resetting, if it returns within one or two operating cycles, the system is telling you it has a real hardware fault that needs a technician.
Measuring cooling performance
A practical field test: once the system has been running for about 15 minutes, hold a thermometer at the return air grille and then at a supply vent. Supply air should read 15 to 20 degrees cooler than the return. A split of only 5 to 10 degrees points to an airflow restriction, a refrigerant undercharge, or a failing compressor. This single measurement tells you more about the system's health than almost any visual check. For context on what normal performance looks like, HVAC performance benchmarks explain why sizing and output matter together.
"A temperature split smaller than 15°F at the supply vent after 15 minutes of operation is a reliable indicator that airflow, refrigerant, or compressor output needs professional evaluation."
Hard limits for DIY work:
- Electrical smell, burning odor, or visible scorch marks on wiring
- Breaker trips more than twice in the same day
- Any suspected refrigerant leak (oily residue near copper fittings, hissing sounds)
- Visible wire damage or melted insulation
- Persistent error codes that return immediately after reset
When to call a professional (and how to document the issue)
When a problem demands more than basic troubleshooting, here's exactly how to proceed and what to share with the technician.
Knowing your own limits isn't a weakness. It's smart ownership. The moment a problem enters electrical or refrigerant territory, you need to step back. Refrigerant handling requires EPA 608 certification and specialized recovery equipment. Working on a sealed refrigerant system without certification is illegal, not just dangerous.
Before you make the call, document everything. A well-prepared service request gets the job done faster and often at lower cost because the technician arrives with context instead of starting from scratch.
What to document before your service call:
- Exact symptoms (warm air, no start, unusual sounds, error codes)
- When the problem started and whether it's constant or intermittent
- Steps you already tried and what changed (if anything)
- Photos of the error code display, condensate pan, or any visible damage
- Before and after temperature measurements if you took them
- The system's model and serial number from the data tag
Property managers have the most to gain from thorough documentation. A component-level symptom log across multiple units helps you identify whether a recurring issue points to a systemic maintenance gap or a vendor performance issue. Bring that log to every service call.
Pro Tip: Create a simple shared document for each property unit that logs every HVAC service event, including the date, symptom, fix performed, and technician name. After two or three cycles, patterns become obvious and you can get ahead of failures before they happen.
Understand what an HVAC contractor is actually trained to handle versus what falls into your zone. That clarity prevents both under-calling (letting small problems become big ones) and over-calling (paying for a service visit to change a filter).
Call immediately if you notice:
- Any burning smell from vents or the air handler cabinet
- Water actively dripping onto electrical components
- The system completely fails to respond after a full breaker reset
- Tenants report symptoms of air quality issues (headaches, unusual odors from vents)
Why most HVAC emergencies are preventable (and what Norco homeowners miss)
Here's an uncomfortable truth we see play out repeatedly: the most expensive HVAC repairs we handle in Norco didn't start as big problems. They started as ignored filters, skipped maintenance visits, and small warning signs that got dismissed.
A dirty filter doesn't just reduce airflow. It causes the evaporator coil to ice up, which causes the compressor to work harder, which wears out the motor windings faster, which leads to a compressor replacement that costs over a thousand dollars. That whole chain starts with a $10 filter that wasn't changed on schedule. Airflow restriction from clogged filters and coils consistently ranks as the top maintenance-preventable failure category for both residential and multi-unit properties.
Norco's climate makes this worse than average. When outdoor temperatures push into the triple digits for weeks at a stretch, your HVAC system runs near full capacity for extended periods. A unit that's 80% efficient in mild weather becomes a breakdown waiting to happen when it's working at its absolute limit in July heat. That margin of safety disappears fast when maintenance has been skipped.
For property managers, documented troubleshooting isn't just operationally useful. It's a liability shield. When a tenant reports a comfort complaint and you can show a timestamped service and maintenance log, you're in a fundamentally different position than if you're relying on memory.
The same logic applies to homeowners. Understanding home HVAC zoning and the way different zones stress your system unevenly is the kind of knowledge that helps you catch problems before they escalate. Scheduled maintenance twice a year, in spring before cooling season and in fall before heating season, is the single best investment you can make in your system's longevity. It's not glamorous advice, but it's the advice that consistently keeps repair bills low and systems running through Norco summers.
Professional help in Norco: Fast fixes when DIY isn't enough
If you've hit a wall with troubleshooting, here's the next step for rapid and reliable repairs in Norco.
DIY troubleshooting has real limits, and in Norco's heat, a stalled system isn't something you can afford to let drag on for days.
At E320 Air, our certified technicians arrive with the diagnostic equipment, EPA credentials, and local experience to handle what basic troubleshooting can't touch. Whether it's a refrigerant recharge, a failed capacitor, a malfunctioning control board, or a full system breakdown, we document every test and every repair with before-and-after measurements so you know exactly what was done and why. You can browse our HVAC installation options if your system is past the point of repair, or review our problem-solving examples to see how we've resolved similar issues across Norco properties. Visit E320 Air to schedule service and get your home comfortable again fast.
Frequently asked questions
Why is my AC blowing warm air but running?
Warm air with a running unit usually points to a dirty filter, incorrect thermostat mode, or blocked airflow around the condenser. Check these three things before scheduling a service call.
What should I do if I see ice on my refrigerant lines?
Turn off the cooling immediately and switch the fan to ON only to begin thawing. If ice returns after thawing and replacing the filter, call a licensed technician to check refrigerant charge.
When is it unsafe to troubleshoot an HVAC problem yourself?
Stop and call a professional if you smell burning, see scorch marks, or suspect a refrigerant leak. Refrigerant and electrical issues require certified expertise and specialized equipment that go well beyond safe DIY territory.
What's the best way to document an HVAC problem before calling a technician?
Note the exact symptom, when it started, what you tried, and any error codes displayed. Capturing component-level details before the tech arrives speeds up diagnosis and often lowers your service cost.